On 26th May 2016, there was a meeting regarding EduTechnovation Day within every subgroup such as publicity, protocol, multimedia/technical, feast and many more. My group took on the role as the publicity team, where we are to make posters for the Edutechnovation Day, and publicize the event. Naqib Syahmi as our programme leader or director explained about the big day. It is vital for us to get a grasp on what will happen to ensure everything will go as planned.
For this week we had no class as we were given space and time to finish our video production.
For this week's class, we are to present our progress on our video production. Honestly, my group is still lagging behind, we still have a lot more work to do, and maybe a few changes here and there in our storyboard. Hopefully we can make it before the video presentations :)
On 13th May 2016, all groups had to present teasers for each video production, where we just showed a few clips that we took for our video. After that, we received some feedback from our lecturers on what we should improve on. Now the fun part begins. On the next day which was 14th May, we had our class field trip to Putrajaya. Here is the link to view the pictures that I took. It's not that great, but I had fun taking them Field Trip Pictures
On this week, we covered the lesson on Photography
Photography is the process of recording visual images by capturing light rays on a light-sensitive recording medium.
We learned on the Three Pillars of Photography, which is;
Shutter speed
Shutter speed is the opening duration of a camera's shutter,
Longer shutter speed promotes to : More light (brighter image), and more motion blur
Shorter shutter speed promotes to : Lesser light (darker image), and less motion blur
Aperture
Aperture is the opening where light enters.
The opening is also called as the f-stop
Smaller f-stop number = larger opening for more light (brighter image) and shallower depth of field (picture on the right side)
Larger f-stop number = smaller opening for lesser light (darker image) and greater depth of field (picture on the left)
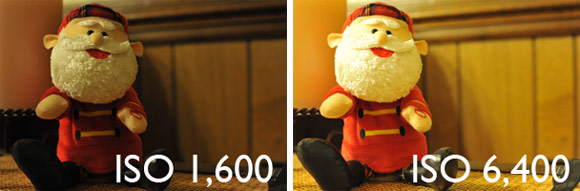
Iso
Iso is basically the level of sensitivity of your camera to available light.
Lower number means lesser sensitivity of your camera to light
Learning these pillars will be very helpful in our photography assignment, and for our own personal use
After that, prior to our photography assignment that will take place in Putrajaya, we are to create our own Flickr account, where we will post the pictures that we took during the excursion.
I don't really take pictures much on my own, but I'm starting to enjoy doing it because it proves to hold sentimental values for myself, and the class taught me on how to take better ones :).
Were back to our class after the mid semester break (notice there is no Week 7 = mid semester break).
For this week's class, we were taught on how to edit videos, using the video editor Windows Movie Maker.
I have used Windows Movie Maker myself a lot in editing my clips, because of its user friendly interface and options, that allows you to do basic editing such as combining clips together, adding transitions between the clips, and adding background music for the videos.
In the class, we were told to search for three videos on Youtube, and combine the videos into one.
And so, this is the result of my video combining.
In editing videos, there are a few things that you should consider, such is :
The scenes that you would like to include in the video
Suitable background music for your video
Taking considerations on these few points, you should be able to create a fine video :) .
Today's class is on the sixth week of the semester. During the class, we were lectured on the essential contents of a video (multimedia).
Basically there are 5 different types of multimedia elements, which is :
Text
The element of text is basically consist of words, sentences, or paragraphs that is included in a multimedia; can differ in font type, size,and color
Image/Photos
Still pictures generated by a camera (photo) or made in a computer. There are several common file formats for images such as JPG, TIF, and PNG.
Video
Moving picture recorded by cameras/camcoders. The quality of the vdeo is determined by one's video capturing device capability.
Animation
Also consist of moving/animated pictures, but can be generated without video recording (compilation of multiple images)
Sound
Any sound/audio element included in a multimedia. A video recorded via camera should contain background sounds. Other than that, there are other sounds that can be added such as music, narration, and sound effects.
After that, we were taught on how to use a sound editing software called Audacity.
Audacity provides a lot of options that you can use to modify your sound files. One of the options is the Noise Removal effect, where you can remove unnecessary background sounds. Basic effects such as cutting the sound tracks, copy, and merging is also available.
Learning this will be useful in producing our video for the Edutechnovation Day, and of course, for other personal use.
On today's class, we discussed on the traditional medias used in teaching and learning. Each groups in the class are to present on how and when the traditional media are used in the teaching and learning. These are the medias that we have discussed on, which is;
Whiteboard/Blackboard
Of course, using the whiteboard/blackboard is as easy as scribbling on its surface, but there are a few tips on how to use it effectively.
First, every teacher should take note on their handwriting when writing on the board. Make sure the writings are clear and tidy, so that the students are able to view the informations better.
Next is the arrangement of information on the whiteboard/blackboard. Do not cramp information on the board as this will make board look messy, and can confuse you and the students. Try to arrange the information properly. Drawing a mind map makes it easier for the teachers to relate each information for the students to learn.
Poster
Poster is used to show brief information to students, and to attract their attention with the colors and the pictures in it.
Photos
Photos are used to support/stimulate students in generating ideas, and make the learning much more enjoyable. Effective on visual learners.
Film/Videos
Works the same as photos, but these are much more elaborate, where moving pictures and sounds come in to enhance student's learning. This would be effective on audio/visual learners, where both medias are used in this teaching aid.
LCD Projector
This is used to project anything on the computer screen, onto a larger screen (the LCD screen) for a much more larger view. This would be very useful to be used in a large class, such as a lecture hall, for easy viewing for the students.
Mahjung Paper/ Flip Chart
A much more traditional teaching aid used back then, where gadgets and electronic equipments are not really integrated in the classroom. However, this is still very effective, and is very flexible if used correctly.
Handouts
Handouts are small notes or exercises given to the students. They can use this to refer back to their previous learning, or to refer to when the teacher is explaining the items on the handouts.
From learning the advantages and disadvantages of the traditional and new media used in teaching and learning process, I can now determine which media is suitable to be used in certain classroom environments, for example the LCD projector, which is very helpful in projecting information or the teaching contents on a larger screen when teaching, so that the students are able to view it much clearer
During the class on 18th of March, all of the groups are to come up with a storyboard for the video we are going to produce for the course.
A storyboard of a video is basically it's 'blueprint', which will definitely help in the production of a video.
What I have learned in creating a storyboard is that first of all, the scenes in the storyboard should be arranged accordingly, to ease the delivery of the message or story that you want to convey. For example, if you want to make a story, you should pay attention to the arrangement of the scenes that you came up with, so that the viewers catch everything, or at least most of the message that you deliver in it.
In the storyboard, you should also make a short description and the type of shot done in every scene . For example, one the the early scene is an opening scene, which uses a close up shot and it is to introduce the contents or title of the video. So those are the basic items needed in a storyboard a video, hopefully this helps! Here is our presentation on the storyboard that we made for our video presentation assignment!
Hello~ I'll be sharing my findings on third week's class, which is on 11th of March 2016
On this week's class we are shown the video's produced by our seniors, which helps us view on the aspects needed in video making. First is the importance of lighting in the video. Lighting has a large impact on a video, where it can render the video difficult to view if it is too low, or too high. The correct amount of lighting will make it easier for the viewers to see what is happening in the video.
Second is the clearness of the audio. Uneven audio volumes in the video can be very annoying and can affect the delivery of the message in the video. Subtitles can be added to scenes that has low audio on recorded speeches. After that is arrangement of the scenes in the video, which helps in properly unloading the message and information in the video, so that it is easier for the viewer to digest and follow the flow of the video.
A lot of aspects are needed to create an effective multimedia in conveying the preferred message, which we all should be aware of if we are to produce one of our own.
The second week of the lecture, we discussed on the domains of instructional technology. What I have learned in this lecture is that we need to use the five domains (Design, Development, Utilization, Management, and Evaluation) in order to carry out the the best possible teaching plan, with assistance of technologies available in the teaching environment (not limited to computers or other gadgets).
Thus, as a future educator, I have to be smart in utilizing the technologies available in order to deliver my teaching effectively
I didn't actually attend the first class, but what I do get from my friends is that we will be using MOOC, or the open learning website a lot in this course. This will definitely make the course a lot more interesting, and I will have the chance to enhance my computer skills. Along with the usage of MOOC, we will also be learning skills in photography, as we are told to produce a video in the end of the course. This skill will definitely be useful and practical in the future.
I'm looking forward to learn a lot of things in this course, that is all.